
Share this Post
This article may contain affiliate links. For full information, please see our disclosure here.
Day 3 of the 5-Day Puez-Odle Altopiano hut-to-hut hike offers an optional add-on/detour for those seeking an extra dose of excitement. This out-and back hike starts and ends at Rifugio Genova (Schlüterhütte).
This segment of the hut-to-hut hike allows for flexibility in scheduling; you can either choose to tackle it immediately after Day 2’s rigorous hike, opt for an early morning ascent before departing for your final alpine hut, or dedicate an entire day to it and truly savour it without any pressure — which is exactly what we did!
We were quite excited about this hike, not least because we didn’t have to carry all our belongings with us. We were going to return to Rifugio Genova (Schlüterhütte) for a second night’s stay after climbing Sass de Putia (Peitlerkofel). Following the previous day’s strenuous hike from Rifugio Puez to Rifugio Genova, we were looking forward to a relatively short but exhilarating hike, complete with a via ferrata to reach the summit.
In this article, I provide a comprehensive hiking guide for Day 3 of the 5-Day Puez-Odle (Puez-Geisler) Altopiano hut-to-hut hike, which we completed in a counter-clockwise direction. This includes hiking statistics, maps, and pictures.
For a comprehensive overview of the entire 5-Day hike, please refer to our article titled Puez-Odle Altopiano: A Multi-Day Hut-to-Hut Hike in the Dolomites.
How to Hike Sass de Putia (Peitlerkofel) in the Dolomites
Sass de Putia (Peitlerkofel) (2875m) is an isolated mountain in the Dolomites, situated between Val Badia (Gadertal) and Val di Funes (Villnösstal) in the Puez-Odle Nature Park, South Tyrol. From its summit, you are rewarded with stunning 360-degree views across the Dolomites.
To reach the true summit of Sass de Putia (Peitlerkofel), you will need to ascend a grade 1 (easy) via ferrata. Via ferrata gear is not necessary as long as you are sure-footed and comfortable with heights. Alternatively, you can hike to its secondary summit, Piccolo Sass de Putia (Kleiner Peitlerkofel), which is only a few metres lower, without needing to climb the via ferrata.
Lacking via ferrata gear, I initially had concerns. However, after consulting with a couple of experienced climbers who were there with their grandchildren, I felt reassured that gear wasn’t a necessity. I also made it clear to the kids that we would turn back if the situation became too risky. Fortunately, we fared quite well, and we found the route not too challenging.
Sass de Putia (Peitlerkofel) Hiking Stats
Start: Rifugio Genova (Schlüterhütte)
Finish: Rifugio Genova (Schlüterhütte)
Distance: 9.05 km
Moving Time: 2 h 50 min
Elapsed Time: 5 h 45 min
Ascent: 725 m
Descent: 725 m
Difficulty: Moderately Strenuous – Strenuous
Minimum Elevation: 2300 m
Maximum Elevation: 2875 m
Map: Tabacco 05 – Val Gardena – Alpe di Siusi / Groden – Seiseralm


Puez-Odle Altopiano Hike Day 3: Sass de Putia (Peitlerkofel) – Elevation Profile

READ MORE: Puez-Odle Altopiano: A Multi-Day Hut-to-Hut Hike in the Dolomites
Sass de Putia (Peitlerkofel) Hiking Guide
The Ascent
From Rifugio Genova (Schlüterhütte), take the uphill path No. 4/AV2, which leads via Passo di Poma (Kreuzkofeljoch) across grassland to Forcella di Putia (Peitlerschärte). This is the path to the left, marked by wooden steps and a fence. (The day before, you would have taken path No. 3 straight ahead to the right to reach Rifugio Genova (Schlüterhütte). Both paths lead to Passo di Poma (Kreuzkofeljoch), so it doesn’t really matter which one you take.)
Once you reach Passo di Poma (Kreuzkofeljoch) after a couple of minutes, keep left to continue north on path No. 4/AV2. Sass de Putia (Peitlerkofel) already comes into view here.

The initial approach is a leisurely walk over grassland. You can already make out the zig-zag path winding its way up Sass de Putia (Peitlerkofel).

About 35 minutes after setting off, you’ll reach Forcella de Putia (Peitlerscharte). Turn right here to follow the path leading into the central fold of Sass de Putia (Peitlerkofel).

15 minutes later, you’ll reach the start of the zig-zag path leading up to Sass de Putia (Peitlerkofel). It’s a steady uphill hike from here.


Looking back to where we came from via the path on the far-right across grassland.

Keep to the right at the fork for a brief section over a rock crest, which is fun and not difficult to scramble up. If you prefer to avoid the rock crest, turn left here. The views steadily improve as you ascend higher.


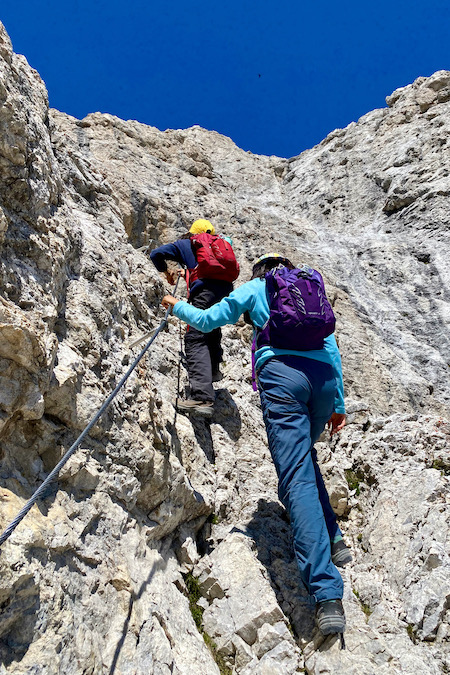
Finally, you’ll reach the broad shoulder where you have two options: The first is to tackle the final cable-aided section via an exposed shoulder for the last 150m, scrambling to the summit of Sass de Putia (Peitlerkofel) at 2875m. Although via ferrata gear is not necessary as it’s graded “easy”, sure-footedness and a head for heights are certainly required.
Option 2 is to turn left and hike the easier route to the twin peak Piccolo Sass de Putia (Kleiner Peitlerkofel), standing only a few metres lower at 2813m.
We opted for option 1 and ascended the cable-aided stretch to the summit.

The image below shows the path to the twin peak Piccolo Sass de Putia (Kleiner Peitlerkofel).

Can you spot the climbers in the picture below?
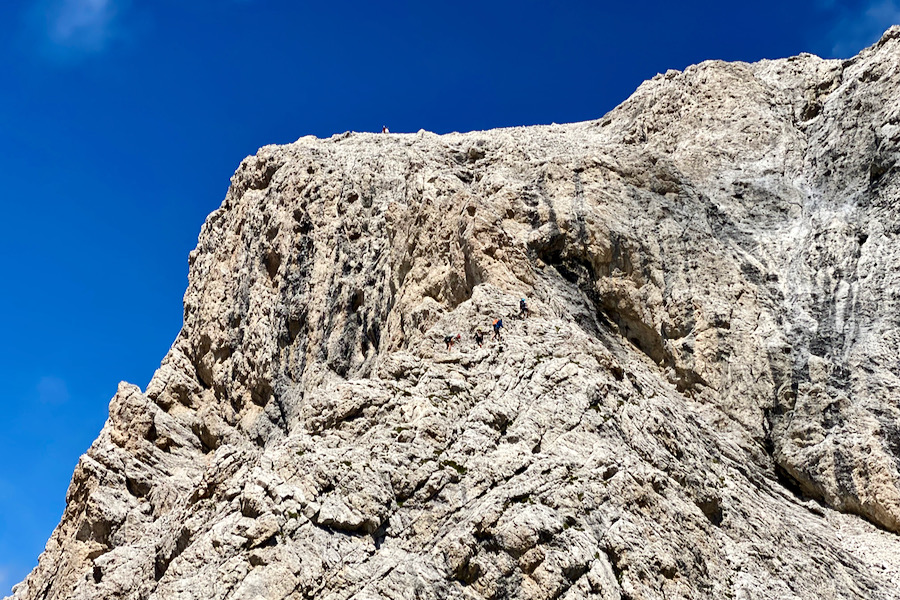
The beginning of the cable-aided section started off easily. And though the climb itself was not challenging, the exposure posed the real danger. That’s why I could only manage to take a handful of pictures, as I literally needed my hands to hold onto dear life (or rock and cable!).

Once on the summit, the 360-degree panoramic views compensate for the final exposed approach.


The Descent
After enjoying the vast views on the summit, retrace your steps and make your way back down again via the cable-protected section.


Once you reach the col again, on your right, you’ll notice the path leading to the secondary summit, Piccolo Sass de Putia (Kleiner Peitlerkofel). You can opt to hike to this summit as well, but we chose not to.

Looking back to Sass de Putia (Peitlerkofel).


Retrace your steps back to Rifugio Genova (Schlüterhütte) for a well-deserved, delicious dinner.

Facilities at Rifugio Genova
Rifugio Genova (Schlüterhütte) offers bunk rooms as well as private rooms. Below is a picture of our cozy private 3-bed room. There were also paid hot showers available. Showering in the tightest shower cubicle with two kids and within 4 (or 5?) minutes is a real skill indeed!

There were also a couple of phone/camera charging stations available. As I had forgotten my charging cable in the car, a fellow hiker was very kind to lend me his. Make sure you have an EU adapter for your plug.

Dinner Options at Rifugio Genova
Rifugio Genova (Schlüterhütte) offers à la carte options for dinner, catering to both, vegetarians and non-vegetarians. The food was delicious, and you can’t miss out on the famous Kaiserschmarrn (fluffy shredded pancake) for dessert. We absolutely loved the slow-cooked venison. Yum!
Overview of the 5-Day Puez-Odle Altopiano Hike
Day 1: Vallunga (Langental) to Rifugio Puez (Puez Hütte)
Day 2: Rifugio Puez (Puez Hütte) to Rifugio Genova (Schlüterhütte)
Day 3: Rifugio Genova (Schlüterhütte) to Sass de Putia (Peitlerkofel) and back
Day 4: Rifugio Genova (Schlüterhütte) to Rifugio Malga Brogles (Brogleshütte)
Day 5: Rifugio Malga Brogles (Brogleshütte) to Vallunga (Langental)
What do Alpine Huts Provide?
- Accommodation: Most mountain huts offer dormitory-style sleeping arrangements with bunk beds or single beds. Some also provide private rooms for couples or small groups.
- Meals: Meals are typically available, including breakfast, lunch and dinner, often featuring hearty mountain cuisine. Packed lunches for day hikes can often be arranged.
- Beverages: Huts serve a variety of beverages, including hot and cold drinks, soft drinks, and alcoholic ones.
- Shower and Toilet Facilities: Huts have bathroom facilities, including showers and toilets. Typically, there is an additional fee for hot showers.
- Blankets and Bedding: Mountain huts typically provide duvets/blankets and pillows, eliminating the need for you to carry your own sleeping bag. However, you will need to bring your own sleeping bag liner/travel sheet. I have a cotton sleeping bag liner while the kids have a super-light silk sleeping bag liner.
- Electricity and Charging: Some huts offer electricity for charging devices like phones and cameras, but it’s not a guarantee. Be prepared with portable chargers if needed.
- Resupplying Essentials: You can often purchase basic necessities like snacks, drinks, and toiletries at mountain huts. Prices are higher due to the remote locations.
- Information: Hut staff can provide information about the trail conditions, weather forecasts, and hiking routes in the area.
Packing List for Hut to Hut Hiking in the Dolomites
Surprisingly, you don’t need to pack as much as you might think for a multi-day hike in the Dolomites. You can purchase all the food in the mountain huts, including a packed lunch. I carried a 30L day pack, while my kids each had an 11L day pack.
Pack one set of evening clothes for use in the mountain huts, a spare set of hiking clothes (consider adding extra t-shirts if you prefer), a spare pair of hiking socks, the bare minimum of underwear that you can manage with comfortably, rain gear, pyjamas, a sleeping bag liner, water-proof slippers to wear inside the mountain huts (as hiking boots are not allowed in the dorms), essential toiletries, and a micro-fibre travel towel. The most important items to aid your sleep will be a pair of ear plugs and an eye mask.
Additionally, include trekking or walking poles, a first aid kit with necessary medications, a sun hat, a buff or warm hat, gloves, a water bladder or water bottle, high-altitude sunglasses, a head torch,a map, a compass, and a dry bag. If you’re planning via ferrata climbs, a via ferrata kit is essential, too.
Pro Tip: A set of thin thermals make for great light-weight and warm pyjamas.
Resources
I planned our multi-day hut-to-hut hike around the Puez-Odle (Puez-Geisler) Altopiano with the help of Cicerone’s guidebook, “Walking in the Dolomites: 25 Multi Day Routes in Italy’s Dolomites”. Other guidebooks that inspired our 3.5-week road trip to the Dolomites included those from Rough Guide and Lonely Planet. For day hikes and Via Ferrata, I used the following guides:
- Cicerone: Shorter Walks in the Dolomites: 50 varied Day Walks in the Mountains
- Cicerone: Day Walks in the Dolomites: 50 short walks and all-day hikes in the Italian Dolomites
- Cicerone: Via Ferratas of the Italian Dolomites Vol 1: 75 routes – north, central and east ranges
FAQs
How long does the hike to Sass de Putia (Peitlerkofel) take?
The hike from Rifugio Genova (Schlüterhütte) to Sass de Putia (Peitlerkofel) and back took us about 5 hours and 45 minutes with a walking time of just under 3 hours. If you don’t spend as much time as we did admiring the views along the way and the summit, 3-4 hours in total is a sufficient time for this hike.
How challenging is the Sass de Putia (Peitlerkofel) hike?
The hike up Sass de Putia (Peitlerkofel) to reach the true summit via the via ferrata route is challenging. You’ll need to be sure-footed as well as have a head for heights. Reaching its secondary summit, Piccolo Sass de Putia (Kleiner Peitlerkofel), is of moderate difficulty.
Do you need a guide for the Sass de Putia (Peitlerkofel) hike?
No, a guide is not necessary for the Sass de Putia (Peitlerkofel) hike. You can undertake it as a self-guided hike with minimal navigation skills, as the paths are well way-marked and easy to follow.
Can you undertake the Sass de Putia (Peitlerkofel) hike with kids in tow?
You can certainly undertake the Sass de Putia (Peitlerkofel) hike with children; however, I recommend to take via ferrata kit with you for safety. This is a great short and easy via ferrata for children as well as a great first via ferrata for everyone. My children were 10 and 13 years old when we completed this hike in the summer of 2023.
How do you make reservations for the Rifugio Genova (Schlüterhütte) alpine hut?
Reservations for the Rifugio Genova alpine hut can be made via their website Rifugio Genova (Schlüterhütte).
Final Words
Hiking Sass de Putia (Peitlerkofel) provided us with our first experience of a via ferrata. Initially, I hesitated at the thought of climbing it without via ferrata gear; however, afterward, I felt a sense of pride. Not only was I proud that we had ascended and descended safely, but also proud of my decision-making process—to attempt the climb but to turn back if I deemed it unsafe to proceed.
To foster personal growth, it’s essential to step out of our comfort zones while remaining mindful of our abilities and those of our children. Moreover, we must trust our instincts and believe that our children will heed our guidance, particularly when it pertains to safety.
Achieving this balance involves taking calculated risks. My children understand this concept well.
Choosing to dedicate an entire day to the hike to Sass de Putia (Peitlerkofel) proved to be the right decision for us. This allowed us to savour every moment without feeling rushed. The breathtaking 360-degree panoramic views made the hike truly worthwhile.
Happy hiking!
RELATED POSTS
- Puez-Odle Altopiano: A Multi-Day Hut-to-Hut Hike in the Dolomites
- Puez-Odle Altopiano Hike Day 1: Vallunga to Rifugio Puez
- Puez-Odle Altopiano Hike Day 2: Rifugio Puez to Rifugio Genova
- Puez-Odle Altopiano Hike | Day 4: Adolf-Munkel-Weg Trail, Dolomites
YOU MIGHT ALSO LIKE
- The Ultimate Family Road Trip Packing List
- 12 Epic Reasons to Solo Road Trip with Kids (and 5 Against)
- Top 20 Family Outdoor Activities in Wales
- Camping Essentials: Complete Checklist for Camping with Kids
- Snowdon Watkin Path with Kids: The Ultimate Picture Guide
Share this Post